Tuesday, September 15, 2015

Mullein Candle Tutorial


This afternoon we decided to make mullein candles to go along with our storytime The King's Candles! Additionally we read up on so many of the medicinal properties of Mullein. Most of the herbcraft requires the blooms and leaves in their summer state so we will have to look back on it next summer. We'll be gathering some seeds to plant more in our yard this fall.

This was our first beeswax project of the season, so it was quite exciting. Melted beeswax makes the house smell like autumn!


When melting the beeswax you will want to set up a double boiler, basically, a pot for the wax within another pot filled with water. You will burn your beeswax if you just try to melt it on the stove. You don't need anything fancy, but whichever pot you choose to melt your beeswax in will probably need to become your beeswax pot as it's very difficult to clean! I have a nice tall one meant for dipping candles.


You will need to chop your wax if you have purchased it in blocks. This is some "Grade B" wax we purchased, which is not recommended for things like cosmetics, but it is perfect for projects such as this. Grade B just means it has not gone through as much filtering, so you may find fragments within it on occasion... we found a little piece of honeycomb in ours today which my daughter enjoyed looking at. 


Add it to the pot, and let the water in the boiler simmer while the wax melts down. It took about 45 minutes for our wax to melt, and meanwhile we learned a new song!


When your wax is ready, dip your Mullein! You will want to make sure they are fully dried. If they are not you can dry them on a vent, or in our case on a sheet in the oven overnight. You don't need to turn the oven on if it is a gas oven. The pilot light in ours makes enough heat to dry things like this


We dipped them maybe 10 times... it did not take a lot of wax to coat them! Then we chopped off the stems. Or you can leave them on and use them as torches!


Ci loved watching her King's Candle burn at snack time! We'll use the other ones we made at supper time! The flame gets pretty tall so they definitely need to be used in a steady candleholder and I would not leave them unsupervised, but if you are stuck in a cave with no light like the King was, then they will do just fine. 


Monday, September 14, 2015

The King's Candles

We have been enjoying stories from "The Topaz Storybook" by Ada M. Skinner, which we discovered through the Forgotten Books website. These stories are wonderful and should not be forgotten! Here is one to tell as the tall stalks of mullein or "King's Candles" are drying! We will be making some King Candles later this week.

UPDATE: Here is our Mullein Candle Tutorial!


The King's Candles
(German Legend)

ONCE upon a time there lived a good king who was driven from his throne by an enemy. A few faithful knights and servants fled with his majesty to a forest where they found shelter in deep, rocky caves.

The flight from the king's palace had been so hasty that the knights and servants could bring only a few things for their king's comfort. It was in the early autumn and his majesty feared it would be necessary to live in secret during the coming winter. You may be sure the king was well pleased to find his knights had brought a few warm blankets and robes. After he had praised his followers for their thoughtfulness in providing for the winter, a young page stepped forward and said, "Your Majesty, I did not bring clothing, but I brought as many candles as I could carry." "Candles," laughed the king, "now pray tell me, lad, why you brought candles. You served The king's page with sinking heart saw the candles grow fewer and fewer until there were but two left. Then at last came an evening when the lights were missing from the king's throne. In a dark corner of the cave the little page sat grieving because he could not see his king's face.

It happened one morning that the lad wandered to the edge of the woodland where the highway separated the richly coloured forest trees from a stretch of meadowland where the white mist was slowly lifting. On the roadside was an old woman carrying a large sack on her bent shoulders. When she reached the place where the king's page was standing she set her sack on the ground and looked wistfully at the meadow, then at the deep ditch which separated the field from the highway. "Shall I help you across the ditch?" asked the king's page. "Thank you, my lad," said the old woman. "Perhaps I'd better not go across. It would be hard for me to reach the highway again. But I should like a few of those tall mullein spikes. I've none in my bag so fine as those growing in the meadow." "I'll gather some for you," said the king's page.

He leaped across the ditch, and soon filled his hands with the tall mullein spikes.

The old woman was delighted. She tucked them into her bag and said, "They make such fine winter candles. Thank you, my lad." "Winter candles!" exclaimed the king's page. "Aye," nodded the old woman. "Dip them in tallow, a thin coat will do " and you have candles fit for a king. Thank you kindly." "We are in sore need of candles where I live, but " the page stopped. "Use mullein spikes. They make candles fit for a king, I say," and the old woman picked up her sack. "But we have no tallow," said the lad. "I can spare you a lump of tallow, my boy. Come along with me to my cottage," said the old woman.

So the king's page carried the sack of mullein spikes to the old woman's cottage and she gave him a large lump of tallow. On his way back he leaped across the ditch again and filled his arms with tall mullein spikes. He hurried back to the cave, melted the tallow, and dipped the weeds into the liquid fat.

When the king and his party returned that evening to the cave, two tall candles were standing on the rude throne. "See," cried the king's page, "we have a fresh supply of candles." "Tell us where you got them," said the surprised king. "They are made from spikes of the mullein weed," explained the king's page. Then he told his majesty about the afternoon's adventure. "The mullein weed shall have a new name," declared the king. "It shall be called the King's Candles." A few days later the king called his followers around his throne seat and said, "A message has come to me declaring that the usurper has been driven out of my country. Tomorrow we'll hold a feast in the palace, and the table shall be lighted by 'King's Candles.' "Every year since that far-off time when the reigning king holds an autumn festival, the banquet table is lighted with mullein spikes dipped in tallow, and they are called the "King's Candles."
"The mullein's yellow candles burn 

Over the heads of dry, sweet fern."


Wednesday, September 9, 2015

Upcycled Dollhouse Doll Tutorial


Here is the little photo tutorial I promised for upcycling a Melissa and Doug dollhouse doll into a "new" doll :) Forgive the photos... I encounter most of my craft projects after dark, so they aren't too great but you should be able to follow along.

1. Start with some old bendy dolls, you will also need either some kind of stretchy cotton knit (I'm recycling a holey t-shirt of my husbands for this piece, you could also use tube gauze... probably the smallest you could find), cotton string, knit interlock fabric (doll skin fabric, which I bought at A Childs Dream website), and some wool to stuff the head. I also use a bit of hot glue or glue of your choice, and wool felt for clothing.


2. Undress your bendy doll. It takes cutting and pulling. Remove the head. Their heads twist off pretty easily. Probably not a good idea to let babies and toddlers play with these! If you would like an easier project, you can keep the wood head. You can sand the face off with some sandpaper, and trim the hair as short as possible to glue the new hair on top. I chose to go with a cloth head on these dolls though so if you are keeping the wood head just skip down past the head making.


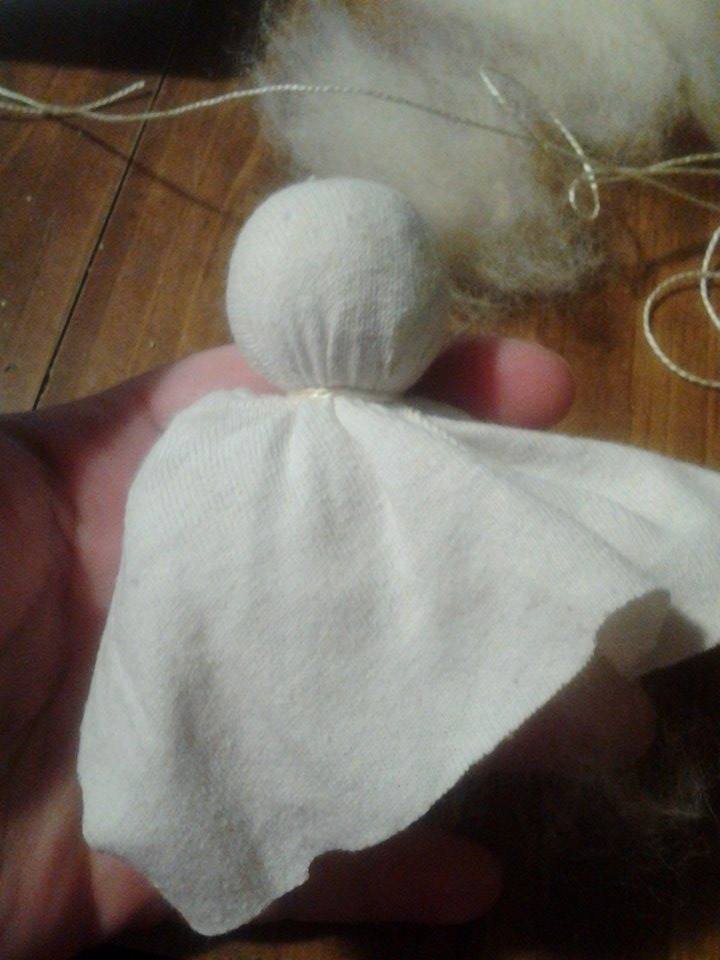
3. Cut a square of your knit fabric. My square was really uneven! About 4 inches by 4 inches should do it...


4. Roll up a nice ball of wool for the head. I like to use something firm inside like a little ball of scrap cotton, and then lay the wool batting in sheets over top so you get a nice round head. You will want a little tuft of wool at the bottom as well to help secure the neck.


5. Cover your wool ball with your knit fabric and compare it to the wooden doll head if you would like to get the correct proportion. 


6. Try to smooth out as many lumps as possible, wrap the string around the neck tightly a few times and tie it off!


7. If you would like to shape your head somewhat, you can tie a string tightly around the middle to make an eyeline. you can go further to make a chin line if you like and even add a nose. I think the "young" dolls look best without a nose, and the grandparents look best with a nose! There are tons of doll head tutorials online so I'm not going to go into details with all these! You can search youtube for videos as well!


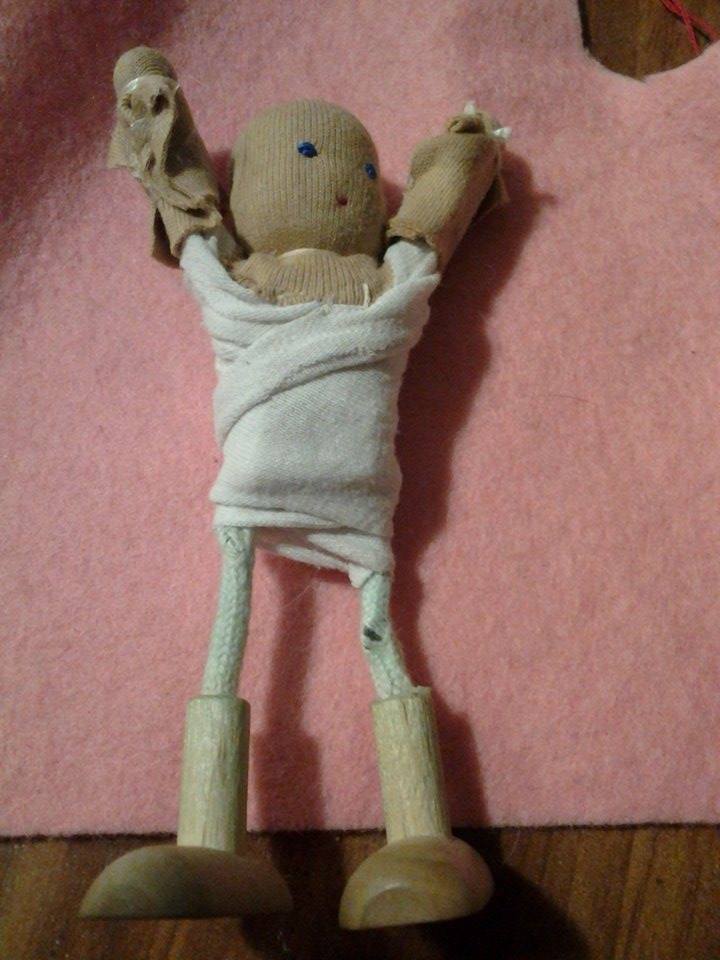
8. Plug in your glue gun to warm up and  then cut some little pieces of your knit interlock doll skin to cover the hands. They don't have to be too big... I think these were about 3/4" by 1.5". Then stretch them around the dolls wooden hands and tie them off at the wrists.


9. Attach the head to the body. I add some glue at the neck, and then I glue down the extra knit fabric all around the dolls body so it's nice and secure. Ths head won't fall off. You can also glue down and trim the extra fabric around the arms. 


10. Sew a thin tube of the knit interlock for the head. It should be just a bit narrower then the doll head. Flip it inside out to sew it.


11. Pull that tube around the doll head and attach it! I sew around the shoulders, back, chest, and secure it to the white knit fabric that I already glued down. Then close off the top of the head. Pull it back a bit so you are working more toward the back of the head. It doesn't have to look pretty as you will add hair to cover it later. 


12. If you would like the doll to have a face, now is the time to embroider it on! Go in from the back of the doll and knot between each new features. There are more tutorials online for the head and face instructions if you haven't done it before and need more help!


13. Now your doll is ready to dress. Arms up! I like to do the bloomers first on the girl doll! Pick your fabric and measure it against the doll. 


14. Bloomers are very simple! I like to pull them all the way up to the chest of the doll since these will be attached to the body. You can see how wide I cut the fabric for this particular pair. This will make them nice and puffy and you can later gather them at the hem. Cut a slit down the very middle for where the legs will be... don't cut it higher than the doll's body!


15. Fold the pants around the leg and stitch up the middle. Then stitch the front closed! This doll looks like a weight loss advertisement right now. 


16. Use a gathering stitch at each ankle and pull it tight to make the hem of each "pant". 


17. Gather around the waist and sew the pants to the knit fabric around the doll body!


18. Here is the shape I cut to make the dress. I ended up trimming it a little more before the end of this one, but the is the shape I used for the full dress on the grandmother doll. 


19. Stitch under the arms, and then I gathered at the waist on this one aross the front and stuffed a little wool in there for a bosom, since she is the mother doll afterall. You can leave that part off if you are making  a girl!


20. I trimmed the wool because I changed my mind about the dress shape part way through, and made her a little A-line dress. The brown is the shape I cut to make her a cute little apron so she looks like a kindergarten teacher!


21. I added a pocket to her dress, and needlefelted her hair on with a little bun. You can use some glue to help keep it on! You can also add a little rosiness to her cheeks which I forgot to do before the picture. I like to color on my finger first with a red beeswax crayon, and then rub it onto the doll cheek next. It takes a couple times to get it dark enough but it's better than putting TOO much on drawing directly on on the doll. All done!


Still working on the family for upcoming stories. I added a little boy to the mix! I love how his overalls turned out!


And the squirrel friend was made with the Squirrel pattern from DelilahIris on etsy. I love all the little animal patterns in her shop. They are so easy to follow. I plan to make a full sized one too, but this one is only about 1 inch tall because I wanted a tiny one!


Here is the little doll family so far! I hope the tutorial helps you create some of your own dolls! Grandpa, Dad, and maybe another Brother are next!


Saturday, September 5, 2015

The Goldenrod and Aster


This will be my new blog to share little craft tutorials as we make our way through the homeschool year. My first project are some archetype dolls for our storytelling thoughout the year. I want to make them simple enough to be used as many characters in many stories with just a change of the apron, cloak, hat, or other props. Here are some sweet little dollhouse dolls that I created from old, mangled Melissa and Doug dollhouse dolls that we had for our story this week "Goldenrod and Aster". Here we have two little girls and the old lady. I will be posting a tutorial later this week as I work on a Boy and Mother doll for our next story, and if I can learn how, perhaps even a printable pattern to download for the clothing! (We shall see!) Subscribe to receive email updates when I post a new tutorial!

UPDATE: Here is the Up-cycled Doll Tutorial!

THE GOLDENROD AND ASTER

Adapted from Cook's "Nature Myths."
THERE were once two little girls who lived at the foot of a great hill; and one had such long, yellow hair that she was called Golden Hair, and the other had eyes as deep and blue as the sky, so every one called her Blue Eyes. And up at the top of the hill lived a wise old woman who could turn people into anything she wished.
It was a long way to the top of the hill, and the old woman was so dark and stern to look at that not every one cared to climb the path to the top; but one day the little girls began to wish that they might do something to make other people happy.
"Let us climb the hill," they cried, "and ask the old woman to tell us what we may do."
So Golden Hair took Blue Eyes' hand, and they started up the mountain side. It was a warm day, and they were obliged to stop many times to rest under the great oak trees which grew on either side of the path. They made baskets of leaves and filled them with berries as a gift for the old woman. They chased the squirrels and watched the gay little fishes darting about in the brook. On and on they walked in the rocky path, until the sun went down and the birds forgot to sing and the squirrels went to bed. Before long the stars peeped out and the moon shone down on them, and they were a long way from home—but they kept on climbing and climbing.
At last they came to the top of the hill, and there, at her gate, stood the old woman looking so stern that the two little girls were frightened, but Golden Hair said, bravely: "We came to ask you what we might do to make every one happy." And Blue Eyes said: "We want to stay together, please."
Then the old woman opened her gate wide for the two little girls to go inside, and she smiled a queer smile, as if she were thinking of magic things; and no one ever saw Golden Hair or Blue Eyes again. But in the morning the green grass on the hillside was full of waving, yellow goldenrod, and close by it grew nodding purple aster.
They say the old woman of the hill walks through the grass every moonlight night touching the goldenrod and aster—and she could tell, if she would, how it was she changed Golden Hair and Blue Eyes into flowers.

You can find more wonderful stories atThe Baldwin Project!